


ワードプレスLuxeritas カスタムCSSで見出しをデザイン
テーマLuxeritasは高機能ですがカスタムしやすいようにデザインはシンプルなつくりになっています。
見出しも元々のデザインではシンプルですよね。このままでも使用できますが、若干見出し3以下の区別がつきにくいとか、見出しとして目立ちにくいという感じもします。
そこでこの記事では、私がこのブログサイトで使用している見出しの作り方を紹介します。
見出しの比較
デフォルトの見出し
デフォルト状態での見出しは以下の通りです。ブログ記事(投稿)と固定ページで差はありません。

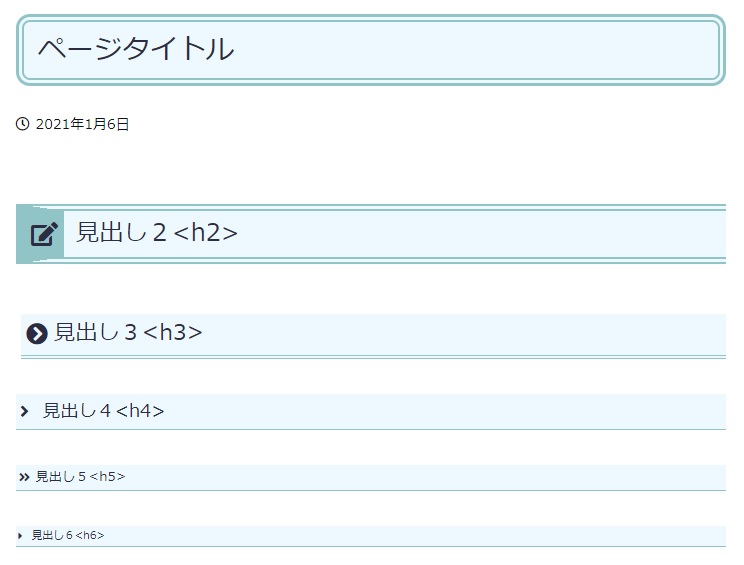
本サイトの投稿(ブログ記事)見出し
本サイトの投稿(ブログ記事)見出しは以下の通りです。
本サイトの固定ページ見出し
本サイトの固定ページは投稿とは少し変えています。
若干デザインを変更したのと、固定ページは1カラムレイアウトにしているのでセンター配置としています。

※実際の固定ページでは、カスタムCSSで日付は非表示としています。
ただし、固定ページは、そのページの内容によって見出しを別途変更することがあるかもしれません。
見出し用カスタムCSS
それでは、これらの見出し用のCSSを紹介します。
カスタムCSSの使用方法等詳細については、次の記事がおすすめです。

投稿用見出しのCSS
まずは、投稿(ブログ記事)用です。
投稿ページに限定するため、セレクターに.singleをつけています。
さらに、投稿ページ内のサイドバーや記事下などには適用したくなかったので、セレクターに子孫セレクターに.postを追加してページ内適用範囲を限定しています。
/* 投稿の見出し */
.single .post h1 {
	color :#2B2C42;
	position: relative;
	background: #EEF9FF;
	padding: 0.25em 0.5em;
	border: double 0.3em #91C4C7;
	border-radius: 0.5em;
}

.single .post h2 {
	color :#2B2C42;
	position: relative;
	background: #EEF9FF;
	padding: 0.25em 0.5em;
	border-bottom: double 0.3em #91C4C7;
	border-top: double 0.3em #91C4C7;
	border-left: solid 2em #91C4C7;
}

.single .post h2:before {
	display: inline-block;
	font-family: "Font Awesome 5 Free";
	content: "\f044";
	position: absolute;
	padding: 0em;
	color: #2B2C42;
	font-weight: 900;
	left: -1.35em;
	top: 50%;
	-webkit-transform: translateY(-50%);
	transform: translateY(-50%);
}

.single .post h3 {
	color: #2B2C42;
	position: relative;
	background: #EEF9FF;
	padding: 0.25em 0.5em 0.25em 1.5em;
	border-left: none;
	border-bottom: double 0.2em #91C4C7;
}

.single .post h3:before {
	font-family: "Font Awesome 5 Free";
	content: "\f138";
	font-weight: 900;
	position: absolute;
	font-size: 1em;
	left: 0.25em;
	top: 0.25em;
	color: #2B2C42;
}

.single .post h4 {
	color: #2B2C42;
	position: relative;
	background: #EEF9FF;
	padding: 0.25em 0.5em 0.25em 1.5em;
	border-left: none;
	border-bottom: solid 0.1em #91C4C7;
}

.single .post h4:before {
	font-family: "Font Awesome 5 Free";
	content: "\f105";
	font-weight: 900;
	position: absolute;
	font-size: 1em;
	left: 0.25em;
	top: 0.25em;
	color: #2B2C42;
}

.single .post h5 {
	color: #2B2C42;
	position: relative;
	background: #EEF9FF;
	padding: 0.25em 0.5em 0.25em 1.5em;
	border-left: none;
	border-bottom: solid 0.1em #91C4C7;
}

.single .post h5:before {
	font-family: "Font Awesome 5 Free";
	content: "\f101";
	font-weight: 900;
	position: absolute;
	font-size: 1em;
	left: 0.25em;
	top: 0.25em;
	color: #2B2C42;
}

.single .post h6 {
	color: #2B2C42;
	position: relative;
	background: #EEF9FF;
	padding: 0.25em 0.5em 0.25em 1.5em;
	border-left: none;
	border-bottom: solid 0.1em #91C4C7;
}

.single .post h6:before {
	font-family: "Font Awesome 5 Free";
	content: "\f0da";
	font-weight: 900;
	position: absolute;
	font-size: 1em;
	left: 0.25em;
	top: 0.25em;
	color: #2B2C42;
}
※2021年3月 h2:beforeにdisplay: inline-block;を念のために追加しました。なくても問題はありませんでしたが、transformプロパティを使用する場合はブロックにしておいた方がよいためです。
固定ページ用見出しのCSS
固定ページ用です。セレクターに.pageをつけて固定ページ用としています。
/* 固定ページの見出し */
.page .post h1 {
	text-align: center;
	color :#d19385;
	position: relative;
	background: #2B2C42;
	padding: 0.25em 0.5em;
}

.page .post h2 {
	text-align: center;
	color :#2B2C42;
	background: #EEF9FF;
	padding: 0.25em 0.5em;
	border: double 0.2em #91C4C7;
	border-radius: 0.5em;
}

.page .post h2:before {
	font-family: "Font Awesome 5 Free";
	content: "\f044";
	color: #2B2C42;
	font-weight: 900;
	letter-spacing: 0.5em;
}

.page .post h3 {
	text-align: center;
	color: #2B2C42;
	background: #EEF9FF;
	padding: 0.25em 0.5em;
	border: solid 0.1em #91C4C7;
	border-radius: 0.5em;
}

.page .post h3:before {
	font-family: "Font Awesome 5 Free";
	content: "\f138";
	font-weight: 900;
	color: #2B2C42;
	letter-spacing: 0.5em;
}

.page .post h4 {
	text-align: center;
	color: #2B2C42;
	background: #EEF9FF;
	padding: 0.25em 0.5em;
	border-left: none;
	border-bottom: solid 0.1em #91C4C7;
}

.page .post h4:before {
	font-family: "Font Awesome 5 Free";
	content: "\f105";
	font-weight: 900;
	color: #2B2C42;
	letter-spacing: 0.5em;
}

.page .post h5 {
	text-align: center;
	color: #2B2C42;
	position: relative;
	background: #EEF9FF;
	padding: 0.25em 0.5em;
	border-left: none;
	border-bottom: solid 0.1em #91C4C7;
}

.page .post h5:before {
	font-family: "Font Awesome 5 Free";
	content: "\f101";
	font-weight: 900;
	color: #2B2C42;
	letter-spacing: 0.5em;
}

.page .post h6 {
	text-align: center;
	color: #2B2C42;
	position: relative;
	background: #EEF9FF;
	padding: 0.25em 0.5em;
	border-left: none;
	border-bottom: solid 0.1em #91C4C7;
}

.page .post h6:before {
	font-family: "Font Awesome 5 Free";
	content: "\f0da";
	font-weight: 900;
	color: #2B2C42;
	letter-spacing: 0.5em;
}
まとめ
投稿用と固定ページ用それぞれの見出しを紹介しました。
Luxeritasでオリジナルの見出しを使ってみたい方の参考になればと思います。
