


ブロック作成②【設定サイドバーにコンポーネント配置できるInspectorControlsとPanelBody】
ワードプレスのブロックの作成方法②としてInspectorControlsコンポーネントとPanelBodyコンポーネントを使って、設定サイドバーでSelectControlを使えるようにします。
この記事は、記事:ブロック作成①【テキスト入力と装飾のRichText、複数選択師のSelectControl】の続きとなっています。
本記事で作成できるブロック
前回SelectControlコンポーネントで実装した色選択ボックスは、ブロック本体のすぐ下に表示されていました。
前回(InspectorControlsを使わない場合)

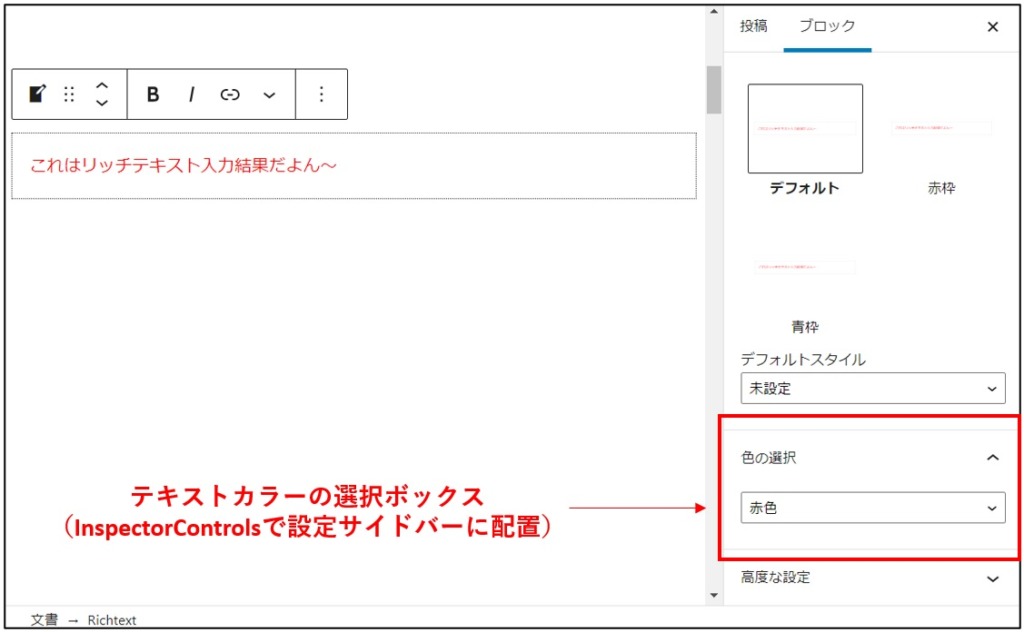
今回は設定サイドバー内で色選択できるようにします。
今回(InspectorControlsを使う)
フロント側(Web表示側)には変更はありません。

今回使うコンポーネントの公式ページは以下の通りです。
- InspectorControls
https://github.com/WordPress/gutenberg/blob/HEAD/packages/block-editor/src/components/inspector-controls/README.md - PanelBody
https://developer.wordpress.org/block-editor/reference-guides/components/panel/
PanelBodyは設定サイドバー内でラベル付きの折りたためるコンテナを形成します。このPanelBodyの中にInspectorControlsを配置します。
PanelBodyが複数あってまとめたい場合は、<PanelBody>の親パネルとして<Panel>を使うとよいでしょう。
コードの変更点
変更するのはedit.jsだけです。
変更前のedit.js
import { __ } from '@wordpress/i18n';
import { RichText, useBlockProps } from '@wordpress/block-editor';
import { SelectControl } from '@wordpress/components';
import './editor.scss';

export default function Edit(props) {
	const { attributes, setAttributes } = props;
	const blockProps = useBlockProps({
		tagName: "div",
		className: "my-richtext",
		value: attributes.content,
		placeholder: "ここにテキストを入力・・・",
		style: { color: attributes.color || null },
		onChange: (newContent) => {
			setAttributes({ content: newContent });
		}
	});
	return (
		<>
			<RichText {...blockProps} />
			<SelectControl
				value = { attributes.color }
				options = { [
					{value: '', label: 'カラーを選択'},
					{value: 'red', label: '赤色'},
					{value: 'blue', label: '青色'}
				] }
				onChange = { (newColor) => {
					setAttributes({ color: newColor });
				}}
			/>
		</>
	);
}
変更後のedit.js
変更点は以下の通り。
- <InspectorControls>内に<PanelBody>を介して<SelectControls>を配置
- ブロック本体<RichText>と<InspectorControls>は<Fragment>で囲む
import { __ } from '@wordpress/i18n';
import { InspectorControls, RichText, useBlockProps } from '@wordpress/block-editor';
import { PanelBody, SelectControl } from '@wordpress/components';
import './editor.scss';

export default function Edit(props) {
	const { attributes, setAttributes } = props;
	const blockProps = useBlockProps({
		tagName: "div",
		className: "my-richtext",
		value: attributes.content,
		placeholder: "ここにテキストを入力・・・",
		style: { color: attributes.color || null },
		onChange: (newContent) => {
			setAttributes({ content: newContent });
		}
	});
	return (
		<>
			<RichText {...blockProps} />
			<InspectorControls>
				<PanelBody title="色の選択">
					<SelectControl
						value = { attributes.color }
						options = { [
							{value: '', label: 'カラーを選択'},
							{value: 'red', label: '赤色'},
							{value: 'blue', label: '青色'}
						] }
						onChange = { (newColor) => {
							setAttributes({ color: newColor });
						}}
					/>
				</PanelBody>
			</InspectorControls>
		</>
	);
}
以上で、設定サイドバー内でSelectControlを使うことができます。save.js側にはもともとSelectControlはないので何も変更ありません。
